Learning Objectives
After this week, students will be able to:
- Use the main markup format syntax in an
rmarkdowndocument- Include images from other URL or saved in a project
- Render simple rmarkdown documents (pdf, html, word)
- R Notebooks are not covered yet
Other software for version control (5 min)
- A wikipedia List of version control software
- And a comparison
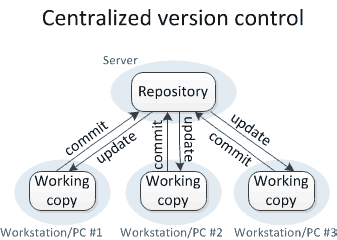
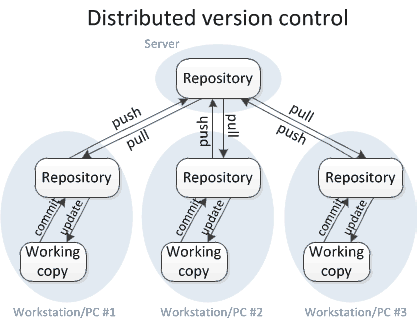
- Centralized vs Distributed version control software:


- Centralized version control examples:
- Open Source: Concurrent Versions System
- Has a cool logo:
 - Proprietary: Microsoft Visual SourceSafe
 - You have to pay to use it!
- Distributed version control examples:
- Open Source: Git
- Ability to create branches and merge them (
git mergeandgit branchwill be seen later during the course). - Ability to create working copies from any public project hosted on GitHub: cloning and forking
- Other platforms for remote hosting of Git repositories.
- Centralized version control examples:
Images from medium original article
Cloning repositories (20 min)
- The
git clonetool:- to “clone” a repository means to make a local copy of it
- you can clone any public repository on GitHub
- to make a remote copy of a public repo in your account, you have to use the “fork” option on GitHub.
- the ability to clone and fork a public repository is one of the features that makes Git and GitHub so widely used and a great tool for collaboration, not only by computer developers!
- Take home activity: Read the Git Basics tutorial Getting a Git Repository
- In-class activity: clone the GitHub repository markdown-cheatsheet to your computer:
- Go to the repository home on GitHub, at https://github.com/LunaSare/markdown-cheatsheet
- Copy the ssh address of the repo. You can find that by clicking on the green button that says “Code”:

- Go to your terminal and change directories to where you want to make the local copy of the repo. If you want the repo on your home directory, you can skip this step.
- Use the command
git clone "paste here the ssh address of the repo"to create a local copy of the repo. - On the terminal, see the contents of the README.md file from the repo. You can use
nano,catorless. - What is the difference between the file that you see on your terminal and the file as it is displayed on GitHub?
Markup languages (5 min)
- A markup language is a text-encoding system consisting of a set of symbols inserted in a text document to control its structure, formatting, or the relationship between its parts (Wikipedia. Retrieved 2022-09-29; Encyclopedia Britannica. Retrieved 2022-08-17).
- Open source markup languages use procedural or descriptive markup. This makes them best for version control because:
- A file can be opened and edited with any text editor.
- Files are always written as plain text and do not contain hidden formatting codes or binary instructions.
- Proprietary word processing software such as Microsoft Word, use a type of markup language called presentational or “What You See Is What You Get”. They are not the best for open science and version control because:
- Files can only be edited with the proprietary software
- Files are written with binary code embedded with plain text, and is hidden from authors and editors.
- Some examples of open source markup languages:
- Markdown: Used for simple text digital documents, such as blogs, comments, messages.
Heading
=======

Sub-heading
-----------

# Alternative heading #

Paragraphs are separated
by a blank line.

Two spaces at the end of a line
produce a line break.
- HyperText Markup Language (HTML): used for websites and the internet in general.
<!DOCTYPE html>
<html>
  <head>
    <meta charset="utf-8">
    <title>My test page</title>
  </head>
  <body>
  <h1>Heading</h1>

  <h2>Sub-heading</h2>

  <h1>Alternative heading</h1>

  <p>Paragraphs are separated
  by a blank line.</p>

  <p>Two spaces at the end of a line<br />
  produce a line break.</p>

    <h1>Mozilla is cool</h1>
    <img src="images/firefox-icon.png" alt="The Firefox logo: a flaming fox surrounding the Earth.">

    <p>At Mozilla, we’re a global community of</p>

    <ul> <!-- changed to list in the tutorial -->
      <li>technologists</li>
      <li>thinkers</li>
      <li>builders</li>
    </ul>

    <p>working together to keep the Internet alive and accessible, so people worldwide can be informed contributors and creators of the Web. We believe this act of human collaboration across an open platform is essential to individual growth and our collective future.</p>

    <p>Read the <a href="https://www.mozilla.org/en-US/about/manifesto/">Mozilla Manifesto</a> to learn even more about the values and principles that guide the pursuit of our mission.</p>
  </body>
</html>
- LaTeX: used for writing documents that include complex math expressions or non-Latin scripts, such as Arabic, Devanagari, Greek, Sanskrit, and Chinese.
\documentclass{article} % Starts an article
\usepackage{amsmath} % Imports amsmath
\title{\LaTeX} % Title

\begin{document} % Begins a document
  \maketitle
  \LaTeX{} is a document preparation system for the \TeX{} typesetting program. It offers programmable desktop publishing features and extensive facilities for automating most aspects of typesetting and desktop publishing, including numbering and  cross-referencing, tables and figures, page layout, bibliographies, and much more. \LaTeX{} was originally written in 1984 by Leslie Lamport and has become the  dominant method for using \TeX; few people write in plain \TeX{} anymore. The current version is \LaTeXe.

  % This is a comment, not shown in final output.
  % The following shows typesetting  power of LaTeX:
  \begin{align}
    E_0 &= mc^2 \\
    E &= \frac{mc^2}{\sqrt{1-\frac{v^2}{c^2}}}
  \end{align}
\end{document}
Rmarkdown (15 min)
Resources: Reproducible documents with rmarkdown “Getting Started with rmarkdown by Coding club”
rmarkdownis an R package that:- allows writing and formatting text and code on the same file using syntax from the markdown markup language
- it allows rendering the documents to multiple formats
- it runs the code and displays the output with a given format
- In-class activity: Create an R project from your newly copied repository markdown-cheatsheet
- Go to RStudio
- Select
New project - When the menu opens, select create New project from
an existing directory - Browse to select the path to the
markdown-cheatsheetfolder - Press the
Create projectbutton
- Install the
rmarkdownpackage withinstall.packages() - Create a new Rmarkdown (.Rmd) file in RStudio and save it using your name, for example
Luna rmarkdown tutorial - The three main parts of an Rmd file:
- the YAML header
- the R global options
- the body of your document:
- Text: overview of the markdown syntax
- R code chunks
- In-class activity: insert code from an R script into your .Rmd file
- Code chunk options - Inline code
- Create a PDF file from your .Rmd file
and first steps for project collaboration on GitHub (15 min)
- Add, commit and push the files that the instructor created.
git pullbeforegit push- Add collaborators to a project so that they can push changes.
Individual Activity (15 min)
- Using the markdown cheatsheet available on the README, use as many format options as you can to make a summary of what you have learned in the course so far.
- Create a PDF file from your .Rmd file
- Add, commit and push the files that you just created.
