Learning Goal
- Familiarize with the main tools of version control with git using RStudio’s graphical user interface.
- Practice creating a new project with RStudio GUI.
Learning Objectives
Following this lesson, students will be able to:
- Explain what is version control and why should we use it in research
- Use Rstudio to:
- create a new git repository locally
- understand the concepts of “staging” and “committing” file versions
- explain what is a hash
display, read and comprehend the git history
Day 1
Intro to git (40 min)
- Do the quizz (20 min)
- Discussion: What is version control and why should we use it? (20 min)
gitfor version control- free
- open source
- distributed repository system (not centralized)
- faster to commit changes locally and offline
- staging area
- commit messages allow team communication
Configuring git (on the terminal, 20 min)
Creating a repository on the terminal
Tracking changes on the terminal
- Tracking changes
- the difference between staging/adding a file or changes to a file and commiting them:
Using git on Rstudio (20 min)
- Git basics in RStudio
- activating git for your project with RStudio: starting a local git repository
- checking the “git status” of your files
- adding files to the staging area: indicating our intention to version control files
- committing files
- it creates a unique numbered version of your work
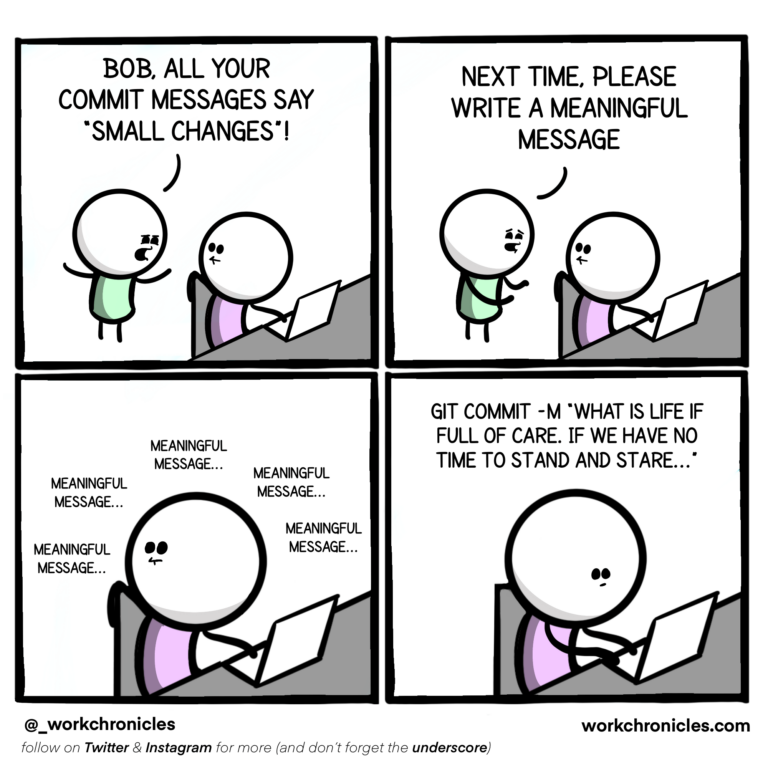
- commit messages must be informative:

- viewing history: viewing the “git log” and “git diff” of versions that we have created
- ignoring files for version control using the
.gitignorefile- which files should we ignore?
- the “.Rproj” files
- directories are not version controlled if they are empty
A minute feedback for class 7
-
Please provide some quick feedback for this session here
-
Homework
- Do the following exercise, (either using the Rstudio GUI or the command line, from the terminal):
- Create a new RStudio project on your computer called “bio”.
- Write a three-line biography for yourself in a file called me.txt, add and commit your changes.
- Modify one line, add a fourth line, add and commit the changes.
- Display the git history of your project. Describe the differences between the updated state and the original state of your repository. Do your commit messages are informative enough to describe the differences?
- Read “best practices for commit messages”
- Make a summary that lists 3 characteristics of a good commit message.
Day 2
Learning Goals
- Learn
gittools for version control of remote repositories on GitHub- Practice usage of Unix shell commands to set up and do remote version control on GitHub
Learning Objectives
Following this lesson, students will be able to:
- Explain the difference between a local and a remote git repository
- Create a new repository on GitHub
- Set up git for usage with GitHub
pushandpullchanges to a remote repository- List alternative software to git for version control
- List other platforms for remote version control with git
- Explain why we use Git
Introduction
- Do the quizz (10 min)
- A version control system is a tool (implemented as software) that keeps track of any changes made on files of a project, effectively creating different versions of our files.
- A repository is the complete history of commits for a particular project and their metadata.
Other software for version control (10 min)
- A wikipedia List of version control software
- And a comparison
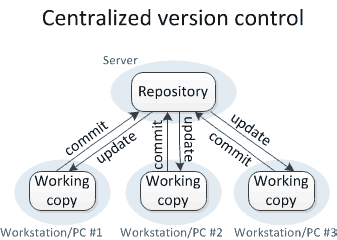
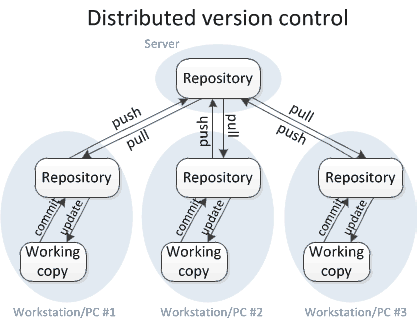
- Centralized vs Distributed version control software:


- Centralized version control examples:
- Example of centralized open source software for version control: Concurrent Versions System
- Pros: It is free
- It has a cool logo
 - Example of proprietary software for version control: Microsoft Visual SourceSafe
 - Cons: You have to pay to use it!
- Distributed version control examples:
- Example of distributed open source software for version control: Git
- As opposed to distributed software, centralized version control has:
- The ability to create branches and merge them (
git mergeandgit branchwill be seen later during the course). - The ability to create working copies from any public project hosted on the web (GitHub): cloning and forking
- Other platforms for remote hosting of Git repositories.
Images from medium original article
- Centralized version control examples:
Remote version control with git
- Lab Remotes in GitHub
- Create a remote repository
- Connect local repository to newly created remote repository
- use SSH and not HTTPS, the latter is more secure
- Set up authentication to remote repositories
- Setting up keys and tokens
- create an SSH key pair
- give your key to GitHub
- manage your password
- Push local repository to remote with
git push - The GitHub GUI
- create a README file
- look at the git history remotely on the Github GUI
- Pulling a remote repository to local repo with
git pull- what happens locally when there are changes to remote?
- what about when there are no changes to remote?
- Look at the git history locally on the terminal with
git log
Group activity
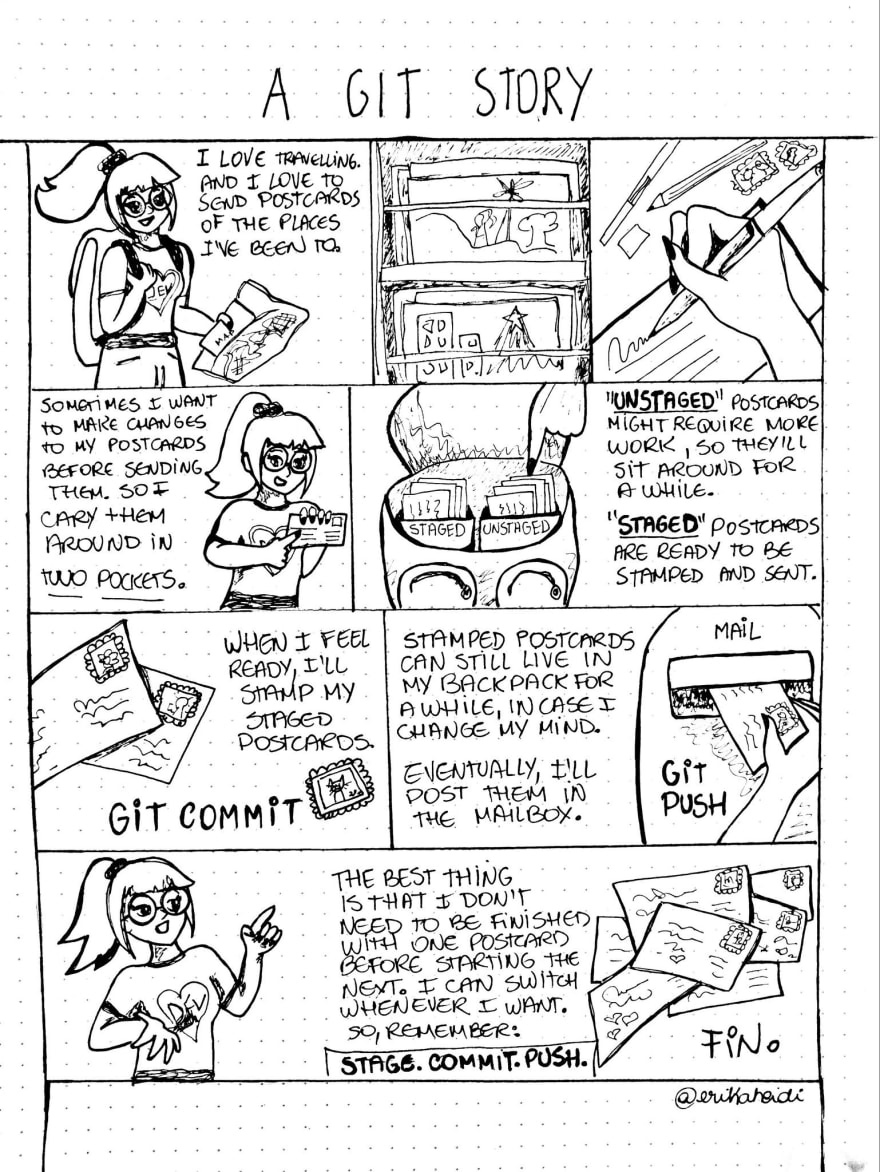
- What is the difference between committing a change and pushing it?
- Read the comic, can you find three main differences between committing a change to a repository and pushing a change?
- Think of another example to illustrate the difference between
git commitandgit push. For example, I imagine that adding a song to my spotify queue is equivalent to committing a file, and then when the song is finally playing and made public that is like pushing the file to the remote repository 😜 Comic by Erika Heidi.
Cloning repositories (20 min)
- The
git clonetool:- to “clone” a repository means to make a local copy of it
- you can clone any public repository on GitHub
- to make a remote copy of a public repo in your account, you have to use the “fork” option on GitHub.
- the ability to clone and fork a public repository is one of the features that makes Git and GitHub so widely used and a great tool for collaboration, not only by computer developers!
- Take home activity: Read the Git Basics tutorial Getting a Git Repository
- In-class activity: clone the GitHub repository markdown-cheatsheet to your computer:
- Go to the repository home on GitHub, at https://github.com/LunaSare/markdown-cheatsheet
- Copy the ssh address of the repo. You can find that by clicking on the green button that says “Code”:

- Go to your terminal and change directories to where you want to make the local copy of the repo. If you want the repo on your home directory, you can skip this step.
- Use the command
git clone "paste here the ssh address of the repo"to create a local copy of the repo. - On the terminal, see the contents of the README.md file from the repo. You can use
nano,catorless. - What is the difference between the file that you see on your terminal and the file as it is displayed on GitHub?
Activity
- What is the difference between fetching changes from a remote and pulling them?

Comic by Allison Hurst
Individual activity
- Create a remote repository called “bio” on your GitHub account.
- Add, commit and push your local repository to your newly created remote on GitHub.
- Add a line to your bio file using the GitHub GUI, and commit it.
- Modify another line of your bio on the GitHub GUI and commit it.
- Find the commit history on GitHub.
- Take a snapshot of the commit history displayed on GitHub and send it to your instructor.
- Now pull the changes into your local repository.
- Get your commit history on the terminal with
git log, take a snapshot of it and send it to your instructor.
A minute feedback for class 8
-
Please provide some quick feedback for this session here
-
Homework
